Showing posts with label dessert. Show all posts

Friday, May 23, 2014

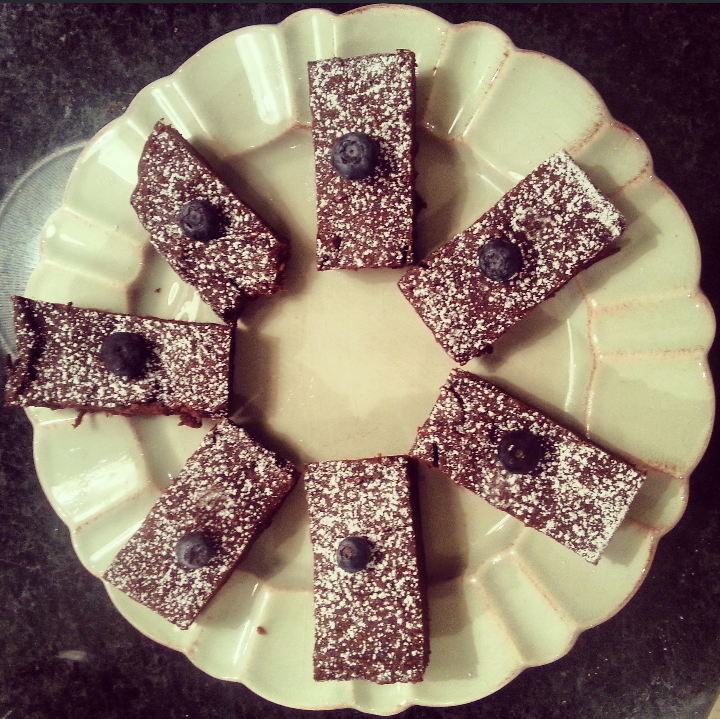
Oooey Gooey Sweet Potato and Date Brownies

Gooey, chocolatey, potatoey, datey deliciousness... note the sneaky nibble taken out of the brownie at 11 o'clock... I couldn't help myself.

For anyone who has seen my most recent post here on BGB, you'll have read I've essentially come to the conclusion that I am sick and tired of the trials and tribulations which come with being an IBS (Irritable Bowel Syndrome) sufferer. I'm fed up of not being able to eat what I want, and I'm sick of eating the same few food combos that I know won't cause me to flare up. I absolutely adore my food. All of it. If it is edible (and sometimes even if it's not) I'll eat it. I am the Joey in that episode of friends, where he takes a fork out of his coat pocket to join in with the others, eating cheesecake off the ground.

So, it's easy to assume that having a disorder that significantly limits what I can and cannot eat, is a massive pain in the proverbial.

So far, Paleo has been a good experience. I've been experimenting a lot with lunch and dinner dishes, but as I have such a sweet tooth, it is dessert and sweet treats that I have been really keen to crack. For my first paleo-themed treat recipe, I've decided to give Brownies a go.


In my element in Mommah Fennelly's kitchen back in Dub-land

After a fair bit of trial and error, this recipe is one I am quite proud of. Some of my favourite foods in the world have just come together to make one of my favourite desserts. These brownies are genuinely the sweetest, softest, gooiest and most moist brownies I have ever made.

The MASSIVE bonus? They are made with nothing but natural goodness. Yep. A handful of 100% natural, unrefined, healthy ingredients. Sweet potatoes, almonds, buckwheat flour, dates, organic cacao and some pure organic maple syrup.

Sweet potatoes are great. They're packed with nutritional goodness, both antioxidant and anti-inflammatory properties don't you know!? They work a dandy number on regulating your blood-sugar levels and contain a silly amount of fibre, so these mouth-watering treats provide a nice 'slow-burn' source of energy.

What about cacao? Well this fellow superfood is an insanely rich source of antioxidants - one of the best in the world, in fact. It is also packed with manganese, which helps oxegenate the blood; magnesium, which helps maintain healthy bodily nerves, muscles and bones; and sulphur, which builds strong nails and hair. Win, win, win!

If ever there was an excuse to eat heaps and heaps of brownies, this is it.

Ok, enough... here's the recipe

Becca's Gooey Sweet Potato, Date & Prune Brownies (makes about 12 brownies)

The Ingredients:

For the brownie batter

  • 2 medium to large sweet potatoes
  • 1 large egg (optional... if egg is something you are trying to avoid, it is fine to take out)
  • 65 grams of ground almonds
  • 50 grams of buckwheat flour
  • 14 dates (medjool the best type)
  • 30 grams of raw cacao
  • 3 tbsp of pure maple syrup
  • A pinch of salt

For the icing

  • 1 tbsp of vanilla extract
  • 175grams of dark chocolate chips
  • 5 tbsp of coconut oil


Bits and pieces (fell in love with mum's Kenwood food processor)

The Method:

  • Preheat the oven to 180C
  • Peel the sweet potatoes, cut them into chunks and put them in water to boil for about twenty mins (you can steam them too but it might take a bit longer). The important thing is that they are really soft
  • Drain and place in a food processer, along with the dates. Make sure to pit your dates, and I also suggest you chop up your dates into little pieces. This helps the mixing process
  • Mix all of the remaining ingredients in a bowl, but not too roughly
  • Add in the sweet potato date mix and stir (make sure you dip a finger in and taste the mix first though, it is heavenly)
  • Place the brownie batter into your baking dish and bake for about 20 mins - or until you can pierce with a knife and it comes out dry
  • Whilst the brownies are baking, get started on the icing by combining the chocolate chips and coconut oil in a pan on the stove. 
  • Place over a low heat until melted and stir in the vanilla extract
  • Allow this mix to completely cool (you can use the fridge to speed this up - about 15 mins)
  • Whip the mix with a hand mixer (electric is best and quickest) until fluffy
  • Allow the brownie cake to cool for at least ten minutes. This is important as it lets the brownie cake set and stick, to give it that yummy, chewy brownie texture.
  • Spread the icing over the cooled brownies before slicing
  • Top with fresh berries if you fancy - blueberries worked a treat for me

Brownie-volution!

The Moozic:

I was lucky enough to be back in Dublin in my parent's house when I baked these delights. Their kitchen is a bit of a baker's dream! Mommah Fennelly has every single baking utensil you could wish for. That all-singing all-dancing food processor you can see in my snaps was a pleasure to play with, and now firmly on the 2015 Birthday AND Christmas whishlist. Anyway, back to music. Mum loves a bit of 'Michael Bubbles', so that he was the music of choice on this occasion. Bit of a guilty pleasure of mine if I am honest.

Happy (and healthy!) baking,

B x


Tuesday, June 18, 2013

Dark Chocolate, Hazelnut & Courgette Cake with Strawberries and Cream Coulis

Quite a mouthful, right?

So, I know the question on about 85% of the minds of those reading this right now - "What in God's name is she doing making a chocolate cake with courgette?"

Well, take a seat, grab a cuppah, pull up a chair... I'll tell you exactly why.

Comfy? Great.

When it comes to baking, there are few things that piss me off as much as a slice of dry, dull cake. This is particularly true in the case of chocolate cake. Personally, when I choose chocolate cake for my dessert, I mean serious dessert ordering business. And that business involves a requirement for a rich, flavoursome, moist, dreamy, chocolate party in my mouth. Does it have to be a big portion? Absolutely not. In fact, you'll know you are eating a perfectly baked chocolate cake when one medium-sized slice is just perfect.

.....What?

With that said, I genuinely had to stop writing this after typing the above, to go and grab myself a(nother) slice. See the bowl in the picture there? See the way it still has chocolate residue in it? About 2 minutes after this was taken.... clean as a shiny new whistle.

So, where were we....

After a recent unforgivable chocolate cake eating experience, I took it upon myself to come up with a recipe that would result in the chocolate cake of Willie Wonka's dreams. After a couple of hours research, and about .5 litres of saliva generation, I came across an article on using certain fruits and vegetables as a 'moistening agent'. The usual suspects were listed - Banana, Apple, berries, carrots and even beets. Tick, tick, tick, tick and tick. I'd tried all of these before and I use them regularly in many different recipes, but with them comes their flavour, and that's not what I was after. I wanted a magical, invisible, tasteless ingredient that could help me to turn my chocolate cake recipe into something quite special!

Enter the mystical and clandestine Courgette.

Now, I did a bit of a number on this recipe. Traditionally, chocolate cake is meant to include, or be covered in, chocolate icing. However, I decided I wanted to "Summer-ize" this a bit, and so came up with the idea of my strawberries and cream coulis.

The Ingredients:

The Cake - 
350g self-raising flour
50g cocoa powder
1 tsp mixed spice
175ml extra-virgin olive oil
375g golden caster sugar (yep, I know. Woah.)
3 eggs
2 tsp vanilla extract
500ml grated courgettes (measure by volume in a jug, but it's about 2 medium courgettes)

140g hazelnuts roughly chopped (bonus flavour points if you can find roasted ones)

The Coulis -
150ml double cream
2 tbls honey (use a light honey)
About two handfuls of strawberries (this can vary depending on personal taste)

The Method:

Cake -
  • Heat the oven to 180C/160C fan/gas 4.
  • In a large bowl, combine the flour, cocoa powder, mixed spice and 1 tsp salt. Make sure everything is sieved
  • In another bowl, combine the olive oil, sugar, eggs, vanilla essence and grated courgette.
  • Mix the dry and wet mixture until just combined, then fold in the toasted hazelnuts. (see pictures below)
  • Line a cake tin – ideally about 22 – 24 cms - with greaseproof paper, then pour in your mixture.
  • Bake for about 40-50 mins, or until a knife inserted into the middle comes out nice and clean.
  • Cool in the tin for 10 mins, then turn out onto a wire rack and leave to cool


See for yourself - two full courgettes!
A note on baking with courgettes: These fellas can hold A LOT of water, which can affect your bake in a not so scrummy way. If your grated courgettes seem watery, place them into a dry, clean cloth and wring out some of the liquid. Then add the courgettes to the cake mixture as normal. 


Strawberries and Cream coulis –
  • Place double cream into a bowl and whip. Bear in mind that this s double cream, so it will whip very quickly. It needs to be quite thick (I’ll explain why in my next point) but just make sure you don’t over-do it
  • Mash the strawberries (a potato masher works well) in a separate bowl until liquefied with some bumpy bits still present
  • Add in honey and stir
  • Combine double cream, folding it all together
  • You should be left with a thick, but still quite watery, baby pink coulis that smells like heaven’s smoothie shop
  • Leave it to sit in the fridge for about 20 minutes – you’ll see it will thicken back up slightly

The Moozic:
I may or may not have gotten caught by my poor neighbours shaking my booty to Pharrell and Robin Thicke's new cracker  a lot, during the making of this yummy monster. Also had Young and the Giant's self titled album playing. It has a really nice Summer sound to it. I am particularly in love with the song entitled 'Strings'. THIS acoustic version is excellent; about as refreshing as my coulis ;-)

One of your 'Five a Day' right there ;-)

When the cake has cooled down, take a big, non-serrated knife, and cut a slice. As much as you may want to do otherwise at this point, I'd advise you don't risk death (or coma) by chocolate, and cut a reasonable size. You'll understand why I say this when your about half way through your first slice. This cake has a lot going on. You simply won't require a big slice. I revert back to my point above - if a chocolate cake is done right and done well, you won't feel the need to stuff your face with it.

Whether you do or not... well, you're only human.

This is another cake that keeps very well, once refrigerated. If you can maintain self-control, it will last up to a week in the fridge after you bake it, and still taste amazing. The courgette works in your favour here.


Monday, May 20, 2013

Nostaligia-licious Upside-down Pineapple Cake

Ah yes, the good old Upside-down Pineapple Cake. When I started baking this one, I got what seemed to be the same feedback from everyone...

"Ah, no way, that cake reminds me of -

a - My mom"
b - My Gran"
c - My Gran's house"
d - My Gran's house in summer when I used to stuff my fat little face with pineapple cake"

... And if it isn't Gran or mum, it's aunt or great aunt.

Everyone has a place in their hearts - and room in their tummies - for this cake. If I had my own restaurant, which I really hope to have some day, i'd have a mini menu, called "Comfort Food". It would have a half dozen savoury dishes, and a half dozen sweet dishes. This would 100% be one of the sweet dishes.

If Upside-down Pineapple cake were a person, you just know it'd give the best hugs, and tell the silliest jokes.

Ok, back to business...

My recipe for this treaty wonder is super simple, and it includes the classic caramel topping. Also, if you fancied whipping up an upside-down Apple cake, you can use the very same recipe and just sub out your pineapples for some good old granny smiths :-)

The Ingredients:
100g / 4oz margarine
100g / 4oz caster sugar
1 tsp vanilla essence
200g / 8oz plain flour
1/2 teaspoon baking powder
1/2 teaspoon bicarb of soda
1 teaspoon cinnamon
2 medium eggs
100ml milk
1/2 pineapple or tin of rings (not chopped. Rings!) 
50g / 2oz soft brown sugar

The Moozic:
In the spirit of nostalgia, i've been rocking out to Flight Facilities. Treated myself to one of their epics mixes, which takes you through some of the 'whippest' tunes that were born between 1992 and 2002. And they do it chronologically... What more can you ask for? Fantastic stuff.

Try this on for size!

Bits n' Pieces
The Method: 
  • Pre-heat your oven to 180°C/ 360°F/ Gas Mark 4
  • Grease an 8″ round baking tin
  • Cream the margarine, sugar and vanilla essence together using an electric mix (until it's all soft and creamy and lush!)
  • Sift in the flour, cinnamon, baking powder and bicarbonate of soda
  • Add the eggs and milk
  • Mix together until smooth, creamy and 'batter like'
  • Sprinkle the baking tin with half of the brown sugar
  • If you went the au-naturel route, peel and core the pineapple. Slice into thin rings and place half the rings into the baking tin on top of the brown sugar. If you took the lazy route and got a can, you really shouldn't need any direction
  • Sprinkle the remaining brown sugar onto the rings after placing them down (check out my pic, it shows you the best way to set the rings - perfect for an 8" tin)
  • Chop the remaining pineapple into fine pieces and stir into the batter
  • Pour the batter onto the pineapples
  • You're good to go! Cook for 40 – 45 minutes or until golden brown and an inserted knife comes out clean
  • Remove from the oven and leave in the tin for 10 minutes to cool. 10 of the slowest minutes in existence.
  • Then gently run a palette knife around the edge of the tin to loosen the cake and turn it onto a cooling tray
Pineapply Goodness!

  • Serve that bad boy with warm with double cream or custard
  • Leave it to cool completely before putting whatever is left over (if there is anything left!), into the fridge.
Slice me off'a piece-a THAT!

This cake keeps very well, essentially because it is doused in so much sugar. It will keep, and be insanely edible, for up to a week after you bake it. Just make sure it is kept refrigerated.

Happy Baking :-)
B x


Sunday, May 12, 2013

Moist-a-licious Walnut, Carrot and Orange Cake

Carrot Cake. One of my all time favourite cakes. I love making this. Nearly as much as I love eating it.

I've baked carrot cake a lot over the last year or so and I have tried a number of recipes. I liked all of them for different reasons, but failed to find one that ticked all the boxes - moistness, devilish cream cheese topping, spicey flavour, fluffy but rich texture - so, I went and designed my own recipe.

"Here's one I prepared earlier" ;-)
There is nothing like a perfectly baked, slice of moist and flavoursome carrot cake. I love to have mine with a yummy cup of peppermint tea.

The Ingredients:

Cake mix -
175g light muscovado sugar
175ml sunflower oil
3 large eggs (lightly beaten)
140g grated carrots (about 3 medium ones will do!)
100g raisins
Grated zest of 1 large orange
175g self-raising flour
1 heaped tsp bicarbonate of soda
1 tsp ground cinnamon
1/2 tsp grated nutmeg (freshly grated will give you the best flavour)
1 bag of whole walnut halves

Icing mix -
200g soft cheese (one standard sized tub of Philadelphia Cream Cheese does the job well) 

50g butter, softened
85g icing sugar, sifted
Pinch of ground cinnamon
The juice of half of 1 large orange


The Moozic:
The Morning Benders, Big Echo

A great sound to bake to, this will have you sauntering about the kitchen. You can check out my own little review of the album on my other blog, here

The Method:

For the cake...

  • Preheat the oven to 180C/Gas 4/fan 160C
  • Oil and line the base and sides of an 18cm square cake tin with baking parchment. I find the easiest way to do this is to cut two long strips the width of the tin and layer each strip crossways, covering the base and sides of the tin
  • Tip the sugar into a large mixing bowl, pour in the oil and add the eggs. Lightly mix with a wooden spoon
  • Stir in the grated carrots, raisins and orange rind
  • Sift the flour, bicarbonate of soda and spices, into the bowl. Mix!
  • Lightly mix all the ingredients - until everything is evenly mixed. The texture should be fairly soft and almost runny
  • Pour the mixture into your prepared tin and bake for 40- 45 minutes, until it feels firm and springy when you press it in the centre
  • Cool in the tin for about 5 minutes, then turn it out, peel off the paper and cool that bad boy on a wire rack
The look of concentration...
For zee icing...

  • God I love this part... With an electric whisk, beat together the cream cheese, butter, icing sugar and cinnamon until smooth
  • Add in the orange juice and continue whisking, but only until it looks mixed in - you don't want to over-mix 
  • Spread over the top of the cake with a tool similar to the one I am rocking in the picture above
  • Decorate with walnut halves. You can do this whatever way you want but for ease of slicing, the way I have done mine works well
  • When this is done, take the the other half of the orange you squeezed for the icing, and grate/sprinkle some zest over the cake.
Aaaaaand done! :-)

B x